Big Shop Update!


Lots of new earrings and necklaces listed in the shop! More will be added tomorrow and expect another big update in a week or so. I'm working on a several new locket styles, so keep checking back!

http://www.papertreasure.etsy.com

L'Opera...Do I Dare?

title
I think in all my time as a Daring Baker (which hasn’t been that long, admittedly), I have been waiting for this challenge. Not this challenge in particular, but a challenge like this. Oh, I do love bread and sticky buns and cake and all...but there in the back of my head lies the dream of making something...patisserie-esque. You know what I mean, something pretty and chic-sounding, something you would find in your neighbourhood French-style patisserie (unless you live in France, in which case it would be a real live French patisserie, in which case lucky you!), something that I am never brave enough to attempt. Something that would make me feel like Audrey Tautou in the mood to whip up something sweet. Yes, I know this French girl fixation has got to stop.

But not today! No, for today we make L’Opera!

As much as I was thrilled at this month’s challenge, I was also shaking in my black ballet flats. This little cake had five parts and five parts in one cake is still a daunting task for me! But I wasn’t backing down because: 1. I wanted to earn French points in the kitchen**, 2. I already pointed out what L’Opera was to C in our neighbourhood patisserie brazenly telling him that I would make it, and 3. I’m a Daring Baker ;)

The syrup – This was the first thing I made as it can be made way in advance. I flavoured it with some vanilla-infused vodka which was given to me by my friend M. I met her through blogging so I thought it fitting to use her fabulous infusion for a blogging event :)

The buttercreamMy first time! Much trepidation here as I thought of hot syrup going into the whirling eggs in the mixer. I am happy to report that all went swimmingly! It came together like a charm and oh-my-lord the smell. Spoons and spatulas were definitely licked. I’ve made buttercream...yeah!

The joconde – Yes, another snazzy French name. You can imagine how thrilled I was to make it! I loved how this almond-based cake turned out. Light and fluffy and soft...a major achievement for me. I think this also had to do with my using a metal spoon to fold...a tip from Donna Hay to avoid deflating your whipped egg whites!

The white chocolate ganache/mousse – This was optional but I wasn’t about to scrimp. I wanted layers! This was a simple whipped cream type mousse – quick and easy to make. I flavoured it again with M’s vanilla/vodka infusion.

The glaze – A simple white chocolate glaze.

Assembly – This is the fun part because all the hard work is done. Joconde, brush with syrup, top with buttercream, another piece of joconde, more syrup, more buttercream, the last layer of joconde, more syrup. A nap in the fridge. Top with ganache/mousse. Another longer nap in the fridge. Top with glaze. Yet another nap in the fridge. Slice! Photograph! Eat!

The more traditional Opera is made with dark chocolate (or coffee), but for this month we have lightened things up! The only rule for the challenge was no dark colors/flavours...everything should be light and bright! I could have gone with light pink (very tempting...pink is my favorite color!) or yellow, flavouring with fruit or honey or liqueur, but I decided to leave everything as white as I could. A white chocolate and vanilla Opera...I wonder how that would sound?

I am very happy to dedicate this month’s challenge to Barbara of winosandfoodies.com – not only is she daring in many ways, she is also a source of inspiration to many (myself included). If there is someone deserving of an Opera full of light it’s you Barbara! Wish we could share a slice of this over a cup of tea and a long chat! :)

Please check our hosts’ sites for the complete recipe: Ivonne, Lis, Fran, and Shea! And for a gugillion versions of this cake go to the Daring Bakers blogroll :)

**Ok, I was too scared to decorate it and make it nice and tra-la-la...one step at a time! Simplicity will have to do for now. This challenge did move me to buy my first ever palette knife and offset spatula (gasp-gasp, I know) so we will see what the future brings...

Mercury Installation


My installation at this year's Portland Mercury Fashion Show.
(Photos by Jessica Poundstone of http://www.jewelrybyjessica.com)

Now Available at Mink Boutique! & LPP!


I'm so pleased to announce that you can now find Paper Treasure jewelry at Mink Boutique (3418 SE Hawthorne Blvd in Portland)!

And... you can now also find Paper Treasure jewels online at the amazing Little Paper Planes site! LPP is dedicated to affordable art and accessories and is curated by the amazing artist, Kelly Lynn Jones. The site was just featured in this months issue of NYLON magazine... Congrats, Kelly! (http://www.littlepaperplanes.com)

Breakfast #20: Not So English Breakfast

title
Are you wondering what happened to the “chicha” in Chichajo? Chicha stands for my love for chicharon and all things piggy (literally and figuratively)…like bacon, ham, slow-braised pork belly, roasted suckling pig, and all that go in that direction. This also stands for my dangerous liaisons with food that is not exactly good for me: Bone marrow, foie gras, burnt animal fat (you know, that bit at the end of a roast), butter, mayonnaise, egg yolk.

Lately, I have humoring my healthy side…indulging in fruits and vegetables and yogurt and granola (all of which I also love). High time to shake things up a little as the “chicha” in me has been clamoring for some action. So I appeased her with this – my slightly Spanish version of an English breakfast.

I wasn’t bashful in the fat department when preparing this, so if you are in any way squeamish about fat and calories and cholesterol, please go no further! Stay here or here and we’ll call you back when it’s safe!

The first time I had an English breakfast was, aptly enough, in London. I was visiting my good friend Christine. She was based in London at the time, and I had just come from Finland. It was my first time to live on my own and away from home. I was thrilled with the freedom and discovery, but work weighed heavy on my shoulders as I fought to learn the ropes far from any support system. Thank goodness for Christine! She was a major lifesaver (still is) during some very anxious times. There were many things she did that cheered me up (and on!) and one of them was preparing an English breakfast for me.

A full English breakfast is a lollapalooza of breakfast proteins and starches (and fat), heaped together on a plate – substantial, zany, unapologetic, and in my book – awesome! Sure you can start with the backbone of bacon and eggs, but for me, the more over the top the better! Yes to the beans and the blood sausage! Yes to toast and hash browns! Fry it up and pile it on!

In that spirit of everything goes, I threw together this version. I had some leftover fabada (a Spanish bean stew) with I used for the beans element. Since my fabada had bacon slab, chorizo, and morcilla, I figured that covered the bacon, sausage, and black pudding. Instead of hash browns I used leftover roast potatoes (from a roast chicken dish) which I refried in olive oil with shallots, red pepper, and olives to stay within the Spanish theme. I then fried an egg in some chorizo oil**, smooshed everything onto a plate with a small baguette, and dove right in!

This type of breakfast is an excellent way to use leftovers, like I’ve done here with the beans and potatoes. It is also the type of breakfast that works great if you are in need of major fortification. Or cheering up. Or if it’s a Sunday and you want to be lazy and piggy :) And it does wonders for a hangover.

Thank you Christine for that long ago English breakfast (and the countless everything elses)! Here’s to sharing more food and adventure with you! :)

**What is chorizo oil? When I make fabada (or fry up chorizo) a lot of deep red, aromatic oil from the chorizo floats up. Normal people would skim this off and toss it. But I’m not normal people. I keep it in the fridge and fry eggs in it. Waste not, want not.

Breakfast #19: Mixed Fruit Yogurt Parfait

title
I didn’t want the week to end without showing you what I did with the rest of my blueberry syrup. You may want to make a nice breakfast over the weekend after all and I want to make sure you have not one, but two suggestions from me :) One rich and decadent, the other lighter, though certainly no less decadent (or less pretty).

Layering in a glass has been all the rage for a while now, and as usual, I am quite late in jumping on the bandwagon. But that has not stopped me before, and it certainly won’t stop me now, or ever :) Call it what you will…verrine, parfait…serving sweets or savories this way gives you a great visual representation of flavor/texture contrasts. Plus, it’s a pretty nice way to have your yogurt :)

It’s no secret that I love yogurt, and that I am always on the prowl for the thick creamy variety I used to have in Greece. I was over the moon when found this one. I was even more thrilled to find a local dairy farm** that makes their own Greek-style yogurt!

And did I mention that mangoes are in season?

So this may look like a simple mixed fruit yogurt parfait, but really what you are looking at is fate in a glass: a brilliant surprise from the market, the season’s darling in fruit, a creamy yogurt long sought-after, and my favorite granola to make things interesting. Seek and you shall find they say…I certainly did :)

No recipe here. Just go to your farmers market. Find some fruit in season – one to make into jam or syrup, one that begs to be eaten fresh. Chat with the purveyors. Get the best yogurt you can find. If you live in Greece say a prayer of thanks to the yogurt deities. Make your own granola (it’s easy!). Pat yourself on the back. Showcase all this in the way they deserve – so that each brilliant layer can be admired (syrup/jam, then yogurt, then fresh fruit, then yogurt, then granola). Sit somewhere where you can see a little sunshine (I live in a little 3rd floor flat in a cramped city, no garden, no balcony, so no excuses…even the tiniest ray will do!). Dunk your spoon in all the way down. Enjoy. Really, I mean it. Stop thinking about what you are going to wear tomorrow or if you have time to gas up the car. Enjooooy.

Happy weekend everyone!

**Rizal Dairy Farms makes Greek style yogurt. It’s thick and creamy and delicious! You can find them at the Saturday Salcedo Market in Makati, or at the fresh produce open air section at Market! Market! Taguig.

I just remembered! I have made a layered dessert before! :)

Portland here I come

I am off to Portland for Quilt Market tomorrow morning. Wee hours of the morning as a matter of fact. So much last minute stuff to do.

I hope that I will see some of you there. Don't be afraid to stop and say hi if you see me.

Henry Glass will be showing some new fabric of mine. We are working on tying up the loose ends as we speak. Whew!

See you there!

Breakfast #18: French Toast with Blueberry Syrup

title

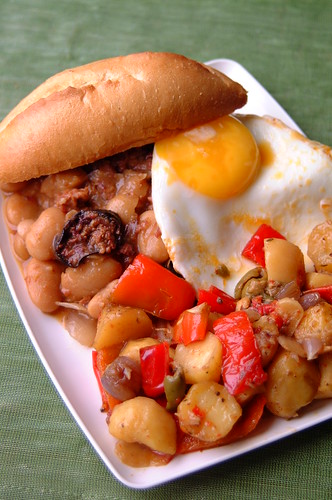
It’s been happy market weekends for me lately…it being summer and produce being plentiful. Despite feeling like I’m in a perpetual sauna, I’m enjoying all that the markets have to offer (along with the weekend trips and the general holiday-like feeling that summer brings). Our gorgeous mangoes are even more gorgeous in the summer and I have been religiously buying them every chance I get (it’s my duty!). This is the perfect season to go to the market with no menu plans in mind…to just let the day’s bounty inspire you, like I did with the carrots and fennel and tomatoes (well, the tomatoes kinda came to me).

As if the season weren't enough, ingenious and determined citizens are growing things like wild rocket, mizuna, kaffir lime, Vietnamese mint, fennel, galangal, butternut squash, and all sorts of goodness. All in all, exciting days for market-goers!

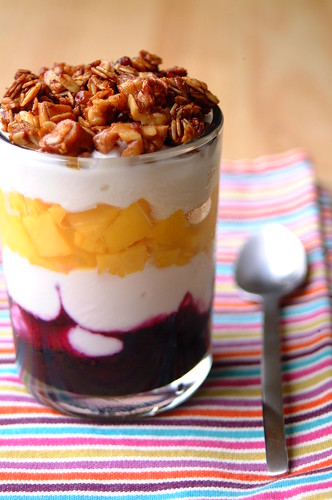
Now, I have bemoaned our lack of berries before. Strawberries are the often-found berries around here. They grow in our mountain province in the North where the climate is more to their liking. Blueberries too, grow up there, but don’t make it down to us as often as the strawberries do.

The produce gods must have been smiling down at me though, because I chanced upon a box of them in the same stall that sold the butternut squash last year. The berries were tiny…much smaller than imported blueberries. They are also less sweet (some were a little sour). But they were local blueberries, and I wasn’t leaving the market without some, so I bought a small 100-gram bag.

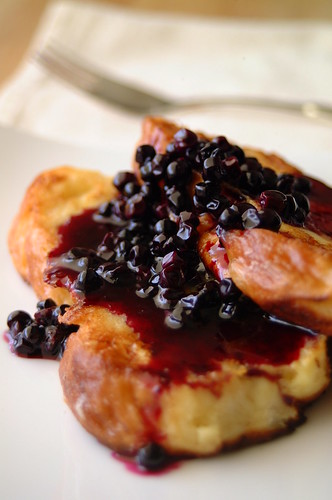
Now, what to do with these less then sweet berries? I pondered the possibilities. Visions of blueberry muffins and blueberry pancakes danced in my head but I feared that the berries weren’t sweet enough. So I decided to do the logical and just add sugar :)

title
Blueberry Syrup
  • 100 grams Baguio blueberries
  • 75 grams sugar
  • 1/4 cup water

- Place all ingredients in a pan over medium heat until mixture bubbles and thickens. Swish contents of pan around occasionally to avoid burning.

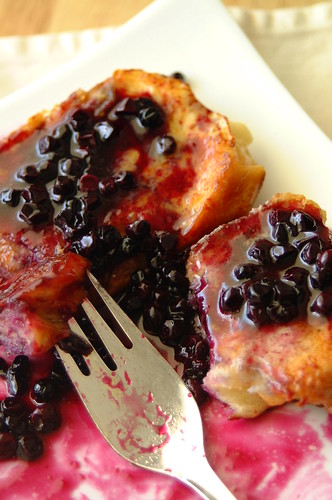
Yes, that’s all! The syrup was dark and glossy and delicious…and just begging to be poured onto something equally delicious – French toast! I used my basic French toast recipe (perfect for a solo breakfast), but substituted Swiss zopf, a challah-like bread that my mum-in-law gives me (which C doesn’t really eat, so I have loaves of it in the freezer, just waiting for meals like these!). I am not making French toast using any other bread ever! You can serve this with a dollop of cream or yogurt…but I prefer my French toast slathered in butter, before pouring on the blueberry syrup. Be generous!

The taste? Oh MY! Have you ever experienced a foot-pop? A foot-pop is what happens when you receive a kiss of such magnitude and dizzying bliss that one knee bends, and your foot “pops” upwards, toes pointing to the sky. You have seen it happen in countless of old movies, and explained by the endearing Mia of Princess Diaries. Well, my dears, it happened to me as I was standing by my kitchen counter eating this! Foot-POP!

If you have just one serving of French toast, as I did here, you will have some blueberry syrup leftover…and soon I’ll show you just what to do with it! :)

Honey Roasted Carrots & Fennel

title

I am lucky enough (in my book at least) to have a husband that loves vegetables. Now, loving vegetables may seem like a regular given in your life but in mine, I can actually count with the fingers on one hand how many of my near and dear can actually claim truth in that statement. Ok, let’s see, there’s one…then um…well, there's my mom

You get the picture.

So, it is with no small amount of joy that I listen to C’s words, “Where’s the veg?

Not to paint a misleading picture of C. He does eat meat…and enjoys it. He is by no means a vegetarian by any stretch of the imagination. And he is just as likely to say, “We haven’t had steak in a while”, as he is to say, “We haven’t had pechay in a while.” He is more an alpha-jock than he is a sensitive-poet. But he does love his veggies…he even loves this one!

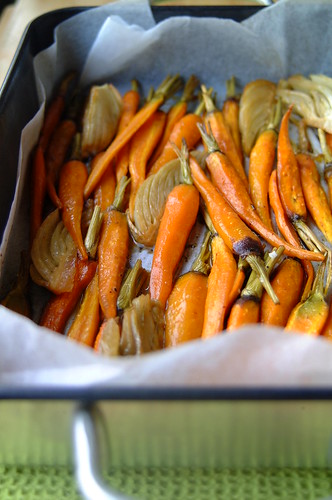
That being said, as with all aspects of life, there are times when, even forearmed with important knowledge, you can still strike out. As I did with these roasted carrots.

I tell you – they were fabulous! Not just any roasted carrots, but honey roasted carrots with fennel. Not just any carrots, but pretty, svelte ones that came crowned with a gorgeous mane of green, from my favorite organic farmer (like these carrots). Not just any honey, but honey from a local bee farm in Tagaytay, brought back for me by my dear friend N. Not just any fennel, but locally-grown fennel which I spotted in the stall of another organic farmer in the market. So you see, pretty special stuff!

I tossed the fennel and carrots with the honey and some olive oil and in the oven they went to slowly roast and caramelize. Roasting is one of my favorite things to do with sturdy vegetables such as carrots -- the slow heat concentrating the sugars until you are left with a soft, yielding piece of veg with all its natural sugars singing in tandem! And for a vegetable like fennel, which I don’t particularly like raw, it tames the sharp anise-flavor, aside from heightening the sweetness. The honey just brings everything to a crescendo…the perfect siding for roast meats, or just to snack on indiscriminately as you would carrot sticks.

Knowing this, you can imagine that I was just a wee bit proud of myself as I trotted this out to C come dinner time. He looked at the pan, and then at me, and said, “Carrots are not really my favorite vegetable…” What??? (Yes, there are still many surprises in marriage) He likes this but not my honey-roasted carrots???

Honey Roasted Carrots & Fennel

  • 500-600 grams carrots (weighed without the stalks)
  • 1 bulb of fennel (mine was about 300 grams trimmed)
  • 3 tablespoons honey
  • 2 tablespoons olive oil
  • Sea salt and freshly cracked black pepper

- Trim stalks off the carrots and peel. If you have bigger carrots, slice lengthways into sticks. Trim and cut the fennel into quarters or eighths (depending on size).
- Line a roasting tin with baking paper, lay carrots and fennel flat in the tin, and drizzle with the honey and olive oil. Sprinkle with salt and pepper. Toss to coat.
- Place in a 180-190C oven and roast for about 35-45 minutes or until carrots are tender.

I shouldn’t complain, I know. C loves most all other veggies. And I can always make this in small batches to enjoy by myself. Plus we will celebrate our 2nd year of “surprises” next week (I know…more to come!) :) So all’s well in love, if not in veggies. You can’t ask for much more than that :)

p.s. I’m secretly hoping my friends will read this and get all defensive, suddenly claiming…"I do like vegetables!"

p.p.s. Incidentally, N, my friend who gave me the honey, isn’t a great big fan of vegetables either…although she does eat them in salad ;)

Bumper Crop: Tomatoes

title
In the city, a bumper crop is something you get when you idle too close to the taxi in front of you in traffic. It never really meant a surfeit of glorious produce, which then brings about the pleasant dilemma of how we are to dispose of our bounty. No, that type of bumper crop belonged in the corner of my head right next to the wood nymphs and faeries, while I satisfy myself with what finds its way to our groceries and city markets.

But times are a-changing as more consumers see the need to: 1. Have fresher produce, untouched by chemicals (and in the process getting closer to the source of where our food comes from), and 2. Support our smaller local farmers (who are really such champs…go local farmers!). Small organic farms/farmers are forming cooperatives and groups to get their products to us. Concerned consumers are working directly with smaller farmers (who perhaps cannot afford to come all this way) to make available the treasures they offer.

So now, aside from the small farmers I see at my markets, and religiously try to support (especially if they show some spunk in trying to grow herbs not commonly available), it is not surprising that emails announcing “Organic tomatoes!” needing to be sold in 10-kilo batches filter down the food chain to little ole me. Organic, native tomatoes, grown by a newbie organic farmer, “grown using local community labor at fair wages”…would I be interested to buy? That would be a resounding yes! :)

We got a tomato-buying group together (10 kilos is a bit of a stretch for C and I no matter how much we like tomatoes) and placed our order of half red, half green tomatoes. I was thrilled when they arrived…truly looking all rosy and cheerful from a life without chemicals. We left for Hanoi the next day so my tomatoes had to take a nap in the fridge (I know, I know, but we had no choice) while we were away. When we got back I was faced with the tomatoes, at this point having to all be used without further delay.

Ah! The “pleasant dilemma of how we are to dispose of our bounty”…this is how we solved it…

Pickled Green Tomatoes
(adapted and pieced together from various recipes)

  • Green tomatoes, about 1 kilo
  • 1 1/2 cups white vinegar
  • 1 1/3 cups water
  • 4 tablespoons sugar
  • 1/2 teaspoon salt
  • 2 bay leaves
  • Black pepper

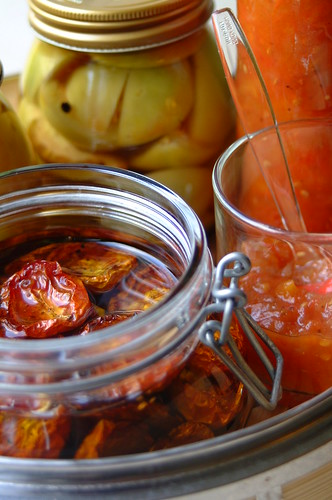
- Place vinegar, water, sugar, salt, bay leaves, and pepper in a saucepan and bring to a boil. Boil for a couple of minutes.
- While you are bringing the pickling solution to a boil, slice your tomatoes into quarters lengthways. Stuff the slices into clean/sterilized (I boil them) glass jars.
- After the pickling solution has boiled for a couple of minutes pour into the jars with the tomatoes until about 1/2 or 1/4-inch from the top, making sure all the tomatoes are covered. Cover and let cool.
- When cool, place in the fridge. Let it rest for about a day before eating. Serve with smoked, grilled, or fried fish. A nice condiment to add to your hamburger sandwiches too!

Tomato Chutney
(adapted from Modern Classics 1 by Donna Hay)

  • Ripe tomatoes, about 500-600 grams, roughly chopped
  • 1 onion, finely chopped
  • 1 cup red wine vinegar
  • 1/2 cup sugar
  • Sea salt and freshly cracked black pepper

- Simmer everything (except the salt and pepper) in a saucepan or a deep frying pan, uncovered, for about 30 minutes or until thickened. Mine took longer than 30 minutes…about 45 minutes – 1 hour until it was nice, thick, and sticky.
- Add salt and pepper to taste, stir, and simmer a bit more, about 5 minutes, then take off the heat.
- Immediately pour into cleaned/sterilized jar/s, cover, and turn sealed jar upside down until cool.
- When cool, turn right-side-up and store in fridge. Serve with savory tarts or pies, or use as relish in ham/roast chicken sandwiches.

Oven-roasted Tomatoes
(adapted from Falling Cloudberries by Tessa Kiros)

  • Ripe tomatoes, about 1-1.5 kilos
  • Olive oil for drizzling and for storing
  • Sea salt and freshly cracked black pepper
  • 2 garlic cloves, peeled and lightly crushed

- Preheat the oven to 200C (400F). Line a baking tray with aluminum foil and brush with oil. You can use a tray or a jelly roll pan, or even a cookie sheet that’s got a little sides.
- Slice the tomatoes in half lengthways and place snugly side by side in the baking tray, seeded side up. Drizzle with some olive oil and sprinkle with salt and pepper.
- Bake for around 15 minutes or until you see the tomatoes sizzling and coloring, then lower the temperature to 150C (300F) for another 1 1/2 hours until they are a little shriveled but not completely dried out. I lowered it to 170-180C and kept it for about 2 hours until I liked the way they looked. They will look similar to the sun-dried tomatoes you get in the store but meatier and not as dried – and tons more gorgeous ;)
- Leave tomatoes to cool then transfer them to a clean/sterilized jar. Place the 2 garlic cloves in the jar and cover everything with olive oil – you can add more herbs and/or spices in here if you like. Store in the fridge.

All recipes were adapted to the tomato quantities we had and are very flexible. Note also that I do not follow any approved procedures for sterilizing and canning. These are immediately refrigerated and consumed shortly after. They are not for long-term storage.

C is loving the pickled green tomatoes…having it as a siding (or what he likes to call pampaganang espesyal) with tinapang bangus (smoked milkfish). The tomato chutney still waits in the fridge for an occasion to trot its sweet-and-sour-y goodness out. My favorite of the bunch though is the oven-roasted tomatoes! The slow-roasting essentially concentrated all the tomatoes’ sweetness and intensified its flavor exponentially. I have used it in salads, pasta, and in one delicious tomato/mozzarella/basil tart! And it is so easy to make! I use the oil it is soaking in as well, adding it to pasta sauces and salad dressings.

I’ve got more local purveyors lined up to try out – this time for fruits and dairy products. My palate is tingling in anticipation :) Go out and support your local farmers today!

I'm submitting this homage to tomatoes and the valiant small farmers who grow them to Weekend Herb Blogging, that wonderful event that celebrates everything that plants can give us :) WHB was created by Kalyn of Kalyn's Kitchen and this week's round is hosted by Laurie of Mediterranean Cooking in Alaska.

So good.


The cherry trees are blooming and it is looking quite beautiful here. I love the fresh colors of spring. The antique quality of our town is just so magical at this time of year.

Last year I couldn't have imagined that I would be saying this but this week has been awesome. Although my family experienced much sadness this week a year ago, it has been a good week this year.

First, the four wonderful firefighters who saved my dad remembered us and it was a comforting feeling. My heroes. Thanks, Bill, Andrew, Bruce and Steve.

Then, a major magazine came to my home for a photo shoot. What fun! Thanks, Nancy, Bryan and Avery. I will definitely let you know when the profile will be published. We worked hard and then ate a lot. Lunched at Pru Thai here in Clinton and then dined at the Pittstown Inn a few miles away. Lots of history and oh so quaint. I am not the best person to be photographed because I simply don't like to pose. The poor photographer. He'd say stay still and I'd move. Thankfully he was a very patient man.


The next day I went into Manhatten to do some work with the fabric company. I love the buzz of the city. I also stopped by Kinokuniya and Tinsel Trading. I love those two stores for inspiration. The garment district is always hustling and bustling. I can't get enough of it.

Finally, one of the firefighters won an award for his efforts. Congrats, Andrew. He couldn't make it to the awards ceremony so he asked my mom to accept on his behalf at tomorrow's ceremony.

These little events and the wonderful people involved are the very proof that life does go on and it is so good.