Have a sweet day!

You've been patient and I've been bad! Sorry. I had my most official aides, Adam and Alex, assist me with the arduous task of selecting the winner of our little contest. I loved all of the stories and they made me laugh. I couldn't decide so my little helpers put all of the names into their plastic orange Halloween pumpkin and pulled out the winner's name.

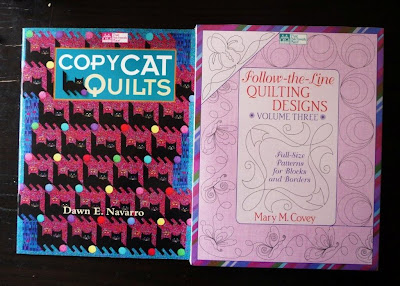
The winner is sugarcreekstuff with her full blown pink eye story. Thanks to all. The winner gets a copy of "New Noel" and "Make Believe" by yours truly and "Copy Cat Quilts" and "Follow The Line Quilting Designs" courtesy of the kind and wonderful folks at Martingale/That Patchwork Place. Plus, I will throw in some fabric, of course.


Is anyone else thinking about Halloween and Christmas? For some reason, I have thinking of pumpkins and sugarplum fairies a lot. I am going to re-visit my free patterns on my web site and have some fun with them. Perhaps you'll make something from the ideas that I will present for gift-giving. xo, L

Lavash with a Vegan & Gluten-Free Dip...Do I Dare?

title
I’m not going to say how long it’s been since I’ve done a Daring Bakers challenge. I’m not going to explain how work/life/people/lack-of-decent-lighting/a-sauna-for-a-kitchen got in the way. All of us have busy lives, and yes, quite a few of us also have blisteringly hot kitchens, but that doesn’t stop them from (against all the odds) rolling out a laminated dough and whipping up multi-steps desserts.

They are my heroes and my inspiration – a kid (or a ravenous family) in one hand, a laptop and Blackberry in the other, a rolling pin and a spatula somewhere in between, and the checkbook’s on her (or his!) head. In stilettos (or those long, narrow man-shoes...I love those, boys!) or sneakers. The guys and gals of the Daring Bakers :)

They are the reason I am here doing this month’s challenge...because who wouldn’t want to be part of that fantastic bunch of people? Well, that and the fact that I love bread. And I know this challenge is not laminated nor is it dauntingly multi-step, but it’s a challenge even so, especially for someone like me: It’s vegan. And gluten-free.

The powers that be have blessed (cursed) me with the ability to eat anything that is not locked up in a vault. Animal, vegetable, mineral...I love it all! Vegetarian food has always been, to me, like some exotic cuisine...delicious to eat, a challenge to cook well, but not something I eat every day. Gluten-free is more a mystery...as I am only just learning about it, so I still get confused what is and what’s not.

That being said I did have a point in my favor...remember my hot as a sauna kitchen? Perfect for anything yeasted and in need of proofing!

I followed the recipe for the Lavash as is, and you can find it at Natalie’s Gluten A Go Go or Shel’s Musings From the Fishbowl. These were the rules:

“You have so much freedom! You can make the Lavash Crackers either with all purpose wheat flour or you can try making them gluten free. You may use any variety of spices/seeds/salt to top the crackers. All dips/spreads/relishes/salsas must be vegan and gluten free.”

Ok...so I could use all purpose wheat flour...not gluten-free, but something that I’ve definitely got stashed in the pantry. I used sesame seeds to top the bread. For the rest of the steps, I followed the Gluten Free dough process because it worked better for me – you see, the gluten free version had you rolling the dough between two sheets of parchment (which is how I like to roll dough) instead of misting the counter with spray oil (which I find too messy). I didn’t get to roll my dough as thin as I’d wanted though, so my crackers were not as paper-thin and “snap-able” as I’d wished. They were not bad for an initial attempt however, and went well with the dip which we served to some friends we had over for dinner.

Oh! Didn’t I mention the dip? Part of the challenge was making a gluten-free, vegan dip to go with the lavash. Now this was more of a challenge for me because I was doing this from scratch – no friendly vegan/gluten-free recipe telling me if I was on the right track. So if something is amiss please let me know!

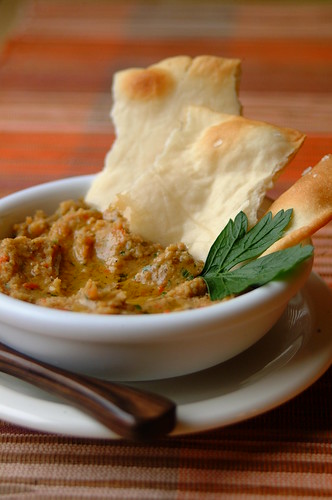
Chickpea and Roasted Capsicum Dip
  • 1 400-gram can chickpeas, drained
  • 2 red bell peppers, de-seeded, roasted and peeled
  • 4 cloves garlic, roasted and peeled
  • 1/4 cup parsley leaves
  • Juice from half a lemon
  • 1/2 teaspoon baharat (an Arabic spice mix, there are many blends depending on country or region...use any you like or make your own), or to taste
  • Sea salt and freshly cracked black pepper
  • Olive oil

- Drain chickpeas and set aside. You may want to save some of the chickpea water to thin out the dip if needed....though I didn’t.
- Roast the peppers and garlic. I cut them in quarters, remove all the seeds, and then lay them skin side up on a baking tray lined with parchment. Place the garlic cloves (remove most the outer peel but leave the last layers on) in a square of foil, drizzle with olive oil and sprinkle with a pinch of salt, close foil over garlic to make a little pouch, and place on the baking tray with the peppers. Place in a 200C oven until the pepper’s skin is black and blistered in place. Take the peppers out, place in a bowl, and cover with cling wrap. Leave to cool slightly. Take your garlic our and poke with the tip of a knife to see if it’s soft. If it’s not, return to the oven to roast some more until soft. When the peppers are cool enough to handle, gently peel off skin (it will come off easily at this point) and set aside. When the garlic is soft, squeeze out of skins and set aside. This can both be done ahead of time.
- In a food processor place chickpeas, roasted red pepper, roasted garlic, parsley, lemon juice, baharat, salt and pepper, and pulse until chopped up finely and mixed thoroughly. Add a couple of glugs of olive oil (depends on your taste and how smooth or chunky you like the dip) and pulse again. Taste and adjust seasoning, and pulse until you reach your desired consistency. If it’s still too thick you can add some of the chickpea liquid, although I didn’t.
- Spread on a shallow bowl and drizzle with extra virgin olive oil to serve.

I loved the challenge of cooking vegan and gluten-free. A different challenge from the usual, but a challenge still...and one that gives us a little glimpse into the lives of our friends who enjoy different eating habits, which makes it even more meaningful and fun in my book :)

Note: In case you are wondering why there are only three crackers in the photo, it's because we finished pretty much everything the night before and it was too dark to take a picture then!

Dinomite!


I haven't forgotten about our little contest. I will reveal the winner in the next day or so. I have the sniffles [which I always seem to get after working on a project].
Meanwhile, I just finished a stitched design based on Alex's drawing of a stegasaurus. Just trace your little one's artwork with a pencil and stitch. So easy yet so satisfying. Your little ones will think that you are the coolest mom when you do something with their artwork. I'm not sure what I'll do with it yet. I'm thinking a little piece of art on canvas. Any ideas?

Roast Pork Belly Sandwich with Chutney

title
How does Monday always do that? No matter how much I prepare myself: organized to-do list in place, iron-clad schedule, outfit planned to the last detail, alarm clock at the ready...it always seems to expertly side-swipe me, coming at me like some devilish linebacker and knocking me off my feet. After which it proceeds to dump wave after wave of work and little surprises on me that I had sworn I was prepped for. But no. Monday is just too wily for me. I can rule the world on Tuesday to Sunday, but never on a Monday.

Which is another occasion when leftovers can save the day. A little smorgasbord of leftovers gathered from the weekend gives me peace of mind that I don’t have to cook on Monday night. As I go through the rigors of a Monday, sweating and swearing (yeah, I do that, surprise) and hoping to get everything done, I can breathe a wee bit easier knowing that I’ve got containers of food ready for dinner. Or at least dinner with minimal preparation.

Yesterday we had brilliant leftovers from the Nigerian food, made by our friend M, for a Saturday night dinner at our flat. Jollof Rice and okra stew (same lovely friend as here). C adores both dishes so M made lots extra so he would have leftovers. We had them yesterday after a round of (ick) gym. Between work and gym, at least dinner was one thing I didn’t have to fret about.

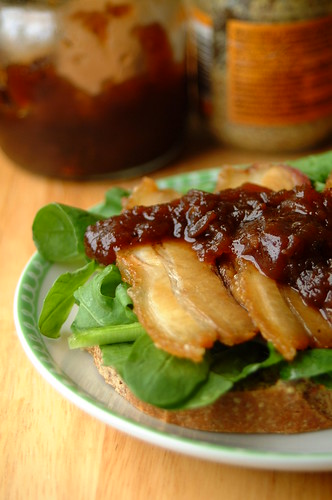
No photos of that since I don’t take food pictures after dark (my “lighting” is off-duty at night) but here is the last 0.5 of our roasted pork belly (see the first round of pork belly leftovers here) that did wonderfully as a hasty lunch. Pork belly...good to the very last!

No recipe as this is so simple to make and consists of things pulled together from what you’ve got around the kitchen. This is perfect if you have leftovers from a pork belly you’ve roasted flat, so you get these slices that look like meaty bacon. Don’t slice them too thin! You can slice them the night before so they are ready to go whenever you are.

Here’s what I did: Figure about 3-4 slices of belly per person. Straight from the fridge, fry pork belly slices in a pan with just a little oil until heated through, golden, and the rind’s a bit toasty. Toast a slice or two of bread per person (depends if you want an open or closed sandwich). Spread one side of bread with a grainy mustard. Top with rocket leaves. Top with the fried pork belly. Top with chutney (I used my spiced apple chutney) and spread. Top with the second slice of bread or leave open.

The pork belly served us well – 2.5 meals for less than the price of one steak! A successful study in leftovers that helped us avoid food waste and saved us some cash to boot.

Here are more ways to avoid food waste:
  • Buying only what you need – do not over-buy when it comes to fresh food (i.e. food that can spoil...I do understand the need to have some extra cans of corned beef in the larder for that unexpected typhoon or military coup)
  • Planning your meals – when you have a solid outline of what you’ll be eating during the week you are less likely to go wild at the market and buy things that will eventually taunt you as it rots.
  • Sharing is caring! – The most fun way to enjoy extra food...have friends over!

    If you you live in Australia, read Barbara’s post on the campaign to stop food waste there...

    If you’d like to share your own tips for avoiding food waste please do! I’m sure we could all use some help :) And maybe I’ll pick one to do in a future post!

    Meanwhile, let weekend leftovers save you a bit of Monday stress! It worked for me :) All I can say now is...thank God it’s Tuesday!
  • Roast Pork Belly Stir-fry

    title
    Leftovers. Good god. What are they good for? Absolutely everything! Say it again...

    (I see Rush Hour on HBO just one time and this is how I am for a whole week!)

    But really now...let’s have a sit down and a chat about leftovers. I’ve already ready mentioned leftover recycling here, but, in my ongoing personal quest against food waste, I think it merits more air time. As the price of food is rising (along with the general cost of living...what fun), I find myself looking for more ways to cut costs every time I’m at the grocery or market. And I’d like to be able to do this without feeling totally bereft of those goodies which I feel I deserve for all my hard work.

    On another front, more and more food is going to waste, which I think is a real crime considering that food is a gift from nature and from God (whichever is your persuasion...it’s still a gift). More so when you consider how many of our fellow humans suffer from a painful lack of daily sustenance.

    Now, I’m not going to get on a platform and tell you the same things told to me about “what happens when you don’t finish your food”. I am as guilty as anyone on that count. Instead, I am going to start finding ways to stretch the food I do have and give my leftovers a new lease on life.

    Starting with this...

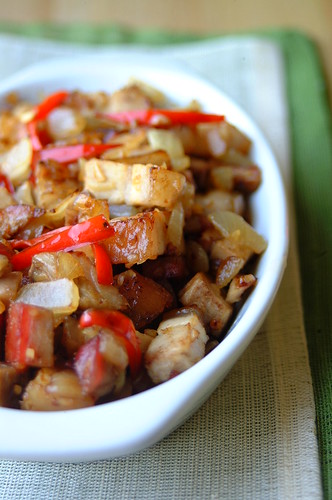
    Roast Pork Belly Stir-fry
    (inspired by Market Man’s use of leftover porchetta)

    • Canola oil
    • 200-250 grams (chopped weight) roast pork belly, chopped
    • 3-4 cloves garlic, finely chopped
    • 1 white onion, chopped
    • 1 red bell pepper, seeded and sliced
    • Freshly cracked black pepper
    • 1-2 teaspoons soy sauce

    - Heat a litle oil in a skillet then add garlic, onions, and red bell pepper. Sauté until onions and pepper are soft.
    - Add chopped pork belly and sauté further until edges are a little browned.
    - Add freshly cracked black pepper, soy sauce, and then quickly toss. Take off the heat.
    - Serves 2 with a bowl of steaming rice. Or with this.

    Pork belly is a cut of meat I adore. It doesn’t take a genius to know I love pork, and its belly is the start of so many beautiful things. A popular way to prepare it locally is simply sliced and grilled – inihaw na liempo. It’s also my favourite cut for roasting, which I discovered when making porchetta. The layers of fat keep the meat tender and juicy during a long slow roast. And, lest we all forget, this is where bacon comes from! These leftovers came from a pork belly I slow-roasted flat. The meat was succulent and tasty but there was no way we could finish it in one sitting, so this is what I served the next day.

    Another brilliant thing about pork belly is the price. The piece we got for the original roast went for less than the price of one steak! And lasted for 2.5 meals instead of 1 (more on the .5 later)! And I certainly did not feel bereft while I was eating it :)

    So, let’s recap: Using leftovers – check! Saving money - check! Still enjoying delicious food – check!

    Next up, what I did with the last of the roast pork belly leftovers! Until then, happy weekend everyone! :)

    Kimchi Fried Rice

    title
    I’m a recipe tester!

    Ok, so that is not exactly true. I haven't taken a new profession. I've only tested one recipe...but still! I don’t let that detract one bit from the thrill of helping (albeit a microscopic bit of help) a fellow food blogger with her soon to be published cookbook! The fabulous Jaden of Steamy Kitchen is coming out with a cookbook (Yay!!! I can’t wait!) and she has enlisted the help of her readers to test recipes. A lot have answered her call for testers! With Jaden’s delicious Asian dishes up for trying, the line goes all the way around the cyber-corner :)

    I came in rather late in the game, bumbling around her recipe testing site, reading instructions and seeing the recipe-feedback from other bloggers. I tiptoed about, hoping nobody would notice the newbie (wannabe) recipe-tester on the block. When I got to the recipe list I was hopping with excitement...so many fantastic sounding dishes, each looking (yes, with pictures!) more enticing than the last, and each with the unmistakable Asian stamp of the Steamy Kitchen!

    Of all those beauties there, this is the one that fairly jumped off the page and into my lap. Kimchi Fried Rice. C and I are kimchi fanatics! When at a Korean restaurant we usually order one side of kimchi for each of us, which usually is finished by the time our main courses arrive (which them prompts us to order even more kimchi). Anyway, you can just imagine what went through my mind when I saw this recipe...

    YESYESYES!

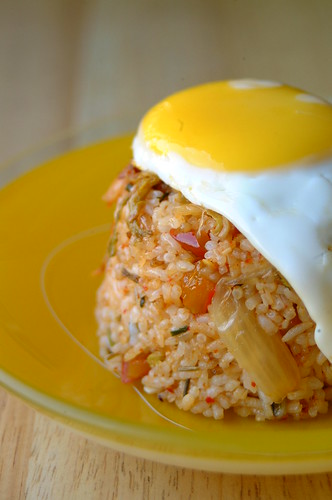
    Jaden says it’s a hangover meal, and I have to agree – this could keep even the most wicked of hangovers at bay! The comfort of eating a bowl of fried rice, combined with the spiciness of the kimchi, and the oozing, runny egg yolk...like a wakeup call in a bowl. C and I had been at friend’s house the night before and the, uh, revelry certainly provided the right setting for having this the next morning. So yes, we can both attest to its efficacy in that aspect as well ;)

    Hangover or not, we absolutely loved it! I will definitely be making this again...with or without the night-before carousing.

    You too can test one of Jaden’s recipes...just visit her recipe testing site here. You need to register but I am confident that the help you give testing recipes will be rewarded with delicious meals and happy diners :)

    Cabbage Chickpea & Chorizo Soup

    title
    I really, really dislike the gym (I’m not going to say “hate” because Santa may be listening). I don’t like being in a room filled with other people while all of you are on machines going nowhere. I don’t like the classes either. I don’t like exercise for exercise’s sake. I don’t like that I have to pay my hard earned moolahs for all that either. There are not many things I really, really dislike, but this is one of them.

    C and my mom, on the other side of the spectrum, love the gym. They are all about sweat, and “pushing it”, and trainers, and endorphins, and other things that I don’t understand. I love you two...but spare me your endorphins!

    Mom: You should really go to the gym sweetie.

    Me: But going to the gym makes me sad.

    Mom: That’s impossible! Exercise gives you endorphins and endorphins make you happy! (My mother = Legally Blond fan)


    Hmmm. If that’s the case, then I wonder what is that euphoria I feel when I slip a piece of perfectly seasoned roasted bone marrow in my mouth? Does it have a fancy chemical name too? :)

    Well, the endorphin gang eventually proved stronger than my weak tush and I have bowed down to mother/husband pressure and bought a pair of trainers. With a vague promise of some physical activity. And a couple of days ago I did what I said I would never do again...I stepped a trainer'd foot (they feel weird and puffy!) in a gym and got on one of those machines that go nowhere.

    What does this have to do with cabbage, chickpeas, and chorizo? Nothing really. Except they make me happy...and happy people will (hopefully) not complain too much about going to the gym ;)

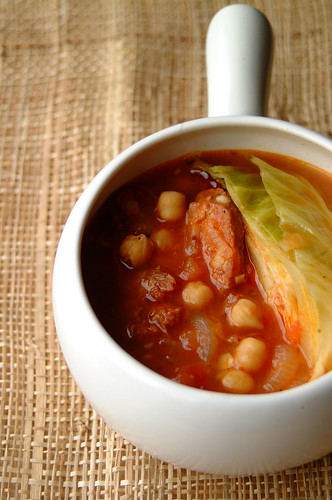
    Cabbage Chickpea & Chorizo Soup
    • Olive oil
    • 1 medium-large white onion, sliced into half-moons
    • 4-5 cloves garlic, finely chopped
    • 2 pieces chorizo Bilbao (about 200 grams), sliced
    • 1/4 cup (or a good fat glug) of white wine
    • 1 400-gram can chopped or crushed tomatoes
    • 1/2 teaspoon pimenton de la vera (Spanish smoked paprika)
    • Generous pinch of dried oregano
    • Freshly cracked black pepper
    • 1 400-gram can chickpeas, drained
    • 1 1/4 cup chicken stock
    • 1 1/4 cup water
    • 1/2 – 1 whole cabbage (whole cabbage about 600-650 grams), whole cabbage cut into eighths, or half cabbage cut into 4 wedges*
    • Optional: Some ham bits (a small handful if you’ve got them around)
    • Sea salt only if needed

    - In a nice and roomy soup pot, heat a couple of glugs of olive oil. Add the garlic and onions and sauté until onions are soft.
    - Add chorizo, ham bits (if you’ve got them) and fry until the chorizo is cooked and the nice orange oil is all over the place. When it’s all sizzling, deglaze the pan with white wine and scrape up all the stuck bits.
    - Add tomatoes, pimenton, oregano, and black pepper, and simmer until thick and pulpy.
    - Add chickpeas, give it a few stirs, and then add stock and water. Simmer for about 15 minutes, stirring occasionally, until all the flavours blend. Taste and adjust seasoning.
    - When it’s just about done, add cabbage, cover pot, and cook until cabbage is soft (about 15-20 minutes), checking occasionally to make sure it doesn’t scorch. Taste again and adjust seasoning if needed.

    *Use a whole cabbage only if you are a fervent cabbage-lover like I am. The whole cabbage really takes over the pot and the soup becomes very chunky, but this is how I like it. I figure a half cabbage or so will do for a soupier soup.

    This soup was inspired by a recipe I found in Donna Hay magazine issue #38 for Cabbage and Chickpea Soup. I added the chorizo and changed the procedure...and this was the result! It’s now in our “regular dishes” notebook (a furry purple one given to me by my godchild) in between the chilli and my mom’s tortilla de patata. This is a robust soup that makes a good meal in itself, maybe with some nice bread (the type you buy from the French guy at your market) . It is particularly good when it’s raining (as it has been this week). Or if you are in need of coddling after a sweaty gym-episode that left you with a blister on you right ankle.

    So, did I feel those much-lauded endorphins in the gym? Let’s just say I felt more toe-curling satisfaction from this soup than from being on the machine. But, I do admit I need more action (the moving around type) in my life. I just hope to find a less gym-involving action before I run through all the songs on my iPod.

    HHDD #22: Chocolate Filled Crepes with Cinnamon Crust

    title
    My pancake conundrum: My husband doesn’t like them. I do. So when it comes to a batch of pancakes it’s either - make a couple of pancakes and let the rest dissipate into inedibility in the fridge, or eat the whole batch. Both options leave much to be desired. I am trying to avoid food waste and I already know that I can’t eat a whole batch of pancakes (without rendering myself totally useless for the rest of the day).

    The third, absolutely intolerable and unacceptable, option is not to make pancakes at all. Which is just not going to happen.

    The best I can do for now is reduce the pancake or crepe recipes I try by as much as I confidently can and then plan to breakfast on pancakes, or anything similar using the same batter, 2 days in a row (leaving the leftover batter to sit in the fridge overnight, which I think is ok because crepe batter is supposed to benefit from an overnight rest). Hopefully, aside from the breakfast pancakes or crepes, I can work it out so I have friends over to whom I can serve a dessert or appetizer made with the excess batter (maybe Nutella crepes or smoked salmon rolls).

    Or I can wait until a brilliant blogger like Suzana of Home Gourmets declares Pancakes to be the theme of the next round of Hay Hay it’s Donna Day!

    title
    Chocolate Filled Crepes with Cinnamon Crust
    (adapted from
    Donna Hay Magazine, issue 34, page 138)
    • 85 grams caster sugar
    • 1/2 teaspoon cinnamon
    • 1 cup flour, sifted
    • 1 tablespoon caster sugar, extra
    • 2 eggs
    • 1/4 + 1/8 cup (3 oz) single/pouring cream
    • 1 cup milk
    • 65 grams grated dark chocolate
    • 25 grams unsalted butter, melted

    - Place the sugar and cinnamon on a plate and mix.
    - Place the flour and the extra sugar in a bowl and mix to combine.
    - Place the eggs, cream, and milk in a separate bowl and whisk to combine.
    - Gradually add the egg mixture to the flour mixture, whisking until smooth. Allow to stand for 20 minutes.
    - Heat a lightly greased non-stick skillet over medium heat. Add 1/3 cup of the batter and swirl to cover the base of the pan.
    - Cook crepes for 1-2 minutes in each side until golden. Place on non-stick baking paper and repeat with the rest of the batter (or just make the amount you need and place the rest of the batter in the fridge like I did).
    - Sprinkle 1 tablespoon of chocolate over each crepe, fold in half, and then fold in half again. Brush both sides with melted butter and press into the cinnamon sugar mixture.
    - Cooked the sugared crepes in a lightly greased non-stick pan (high heat) for about a minute on each side, or until the sugar is caramelized.

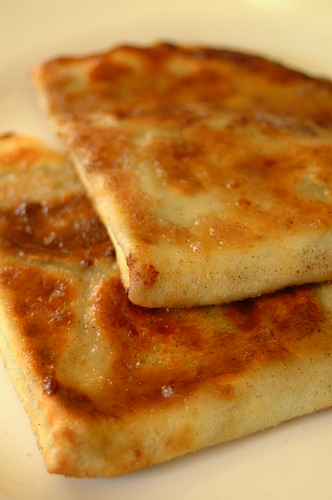
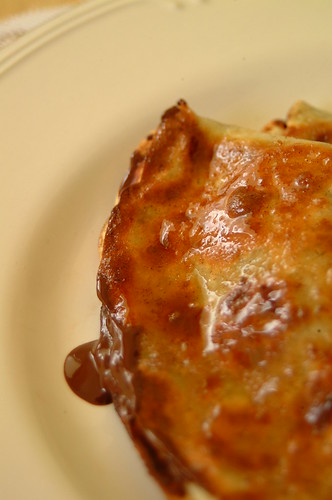
    The combination of the dark chocolate and the subtle cinnamon flavour was perfect! But what really takes this over the edge into goodness oblivion is the caramel-ly exterior, all sweet stickiness and crunchy edges. I can see this being a fantastic dessert but, being a creature of breakfast, I had it in the morning with my coffee...bliss! I’m sure it’ll be great with a bit of vanilla ice cream too!

    The recipe I have posted here is my halved version. I made two crepes for my breakfast and then used some of the batter to make smoked salmon rolls (with cream cheese, sour cream, dill, capers, and green onions) for a casual night of drinks at our flat. I know the batter is supposed to be for a sweet crepe, but the crepes themselves weren’t sweet at all so I thought it would be fine to use for a savory appetizer. Be that as it may, I was still left with a little batter that eventually had to be tossed :( So to any pancake/crepe experts out there I have three questions:
    1) How long can you keep pancake/crepe batter safely in the fridge?
    2) Any other variations you like? Savory and sweet suggestions are welcome!
    3) Do you have a really low yield pancake/crepe recipe? :)

    Hay Hay It’s Donna Day is a food blog event celebrating Donna Hay’s special yet simple dishes (I love Donna!) and was created by Barbara of Winos and Foodies, and is now under the expert care of Bron of bronmarshall.com

    Whew! I Need A Nap! And a contest too!


    The first week of school went by so quickly. I didn't have much time to think about my baby going to kindergarten. I had to celebrate a birthday too. How could I forget? He has reminded me everyday for the past 3 months that his birthday was coming up. Happy birthday, baby.

    It has been a little crazy around here. I always said that I wouldn't over-schedule my kids but guess what? It is official. I am a mommy-cab. We have tae kwan do, violin classes and chinese school. The only defense that I have is that they want to do it.

    I had promised a little contest. E-mail or leave a post of your funniest story about your kindergarten experience and I will put a little box of goodies together. Don't know what it will be but it will include some fun stuff. It will include some of my stuff and some from other designers. All products are manufactured or published by Henry Glass or That Patchwork Place. High quality stuff for sure! Let's have entries in by Friday, September 19 at 8 p.m. east coast time. Why so long? Well that'll be the first time I'll have a stress-free moment.

    Breakfast # 24: Breakfast Burrito

    title

    Or what happens the morning after a Mexican dinner.

    I’m sure no one is a stranger to having leftovers from the night before for the next day’s breakfast. Dinner recycling is quite common unless you are lucky enough to have someone make you breakfast a-fresh every morning (if you are that lucky perhaps you’d like to invite me over!). I try my best though...and you see the result of these efforts in the breakfast posts on this blog. The rest, sadly, do not often see the light here.

    You see, it’s usually the pretty looking, delicious sounding, recipe-included dishes that make it to publication. If I included leftovers and those madcap creations I winged together last minute (although delicious as well) I would have a lot more posts. In reality, we don’t dine on a new dish, from a new recipe, every night. A lot of what graces our dining room table are meals put together quickly and with no specific recipe, or leftovers from a previous dinner. And I am not particularly excited about posting those (although some of those wing-it dishes are really good...they just have no recipe yet, so still undergoing more testing!).

    Times are changing though. Food costs are going up. At the same time, more and more food is being wasted every day. Goodness knows I am guilty of that crime myself. So I’ve decided to post some of my leftover recycling :) This way, I challenge myself to find more means to use up my leftovers, reduce my food waste, and exchange ideas with all you brilliant people out there!

    And the great thing about leftovers for breakfast? Everything is already prepared! You can throw this together in three minutes with your eyes still bleary from sleep!

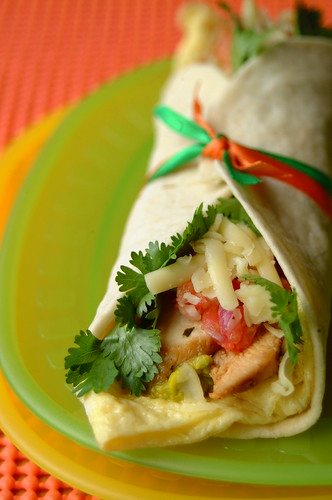
    We had a Mexican dinner the night before of chilli con carne, chicken fajitas, homemade salsa, and guacamole. C is a huge (HUGE) fan of Mexican food. Because of the sad lack of Mexican restaurants over here (a big mystery that), we try to have Mexican dinners at home every once in a while, and this was one of those nights. Reaching into the fridge for my yogurt the next morning I decided to gather the leftovers instead and stuff them into a tortilla wrapper with some egg for a yummy breakfast burrito!

    Here’s what I did: Take one egg and lightly beat it. Pour into a hot, greased skillet and spread the egg out as thin as you can (like making a crepe). Flip when underside is done and lightly cook the other side. Lay egg on a tortilla wrapper. Pile on the goodies you had for your Mexican dinner last night. I used guacamole, chicken for the fajitas, salsa, grated cheese, and cilantro sprigs. Wrap it up. Enjoy!

    Leftovers, just like the fashion from the 80’s and 90’s, are no longer garage sale fodder. They are hip little numbers sashaying their way across our closets and plates. Unlike 80’s fashion though, making leftovers new again helps our grocery bill and our environment! Need more inspiration? Just go over to that search box in my sidebar called Food Blog Search and type in “leftovers”...you will see what I mean :)

    Some of my leftovers that did make it to posts:

  • Risotto Patty with Prosciutto and Egg and Pesto
  • Leftover Osso Buco Pasta
  • Not So English Breakfast
  • Inspiration and a Cool Read

    What inspires you?
    One of the ways that I am constantly inspired is through travel. I go back home to Toronto a lot. My family owns property in Chinatown there and it is always fun to step outside the door and look around. There are so many different things that arouse the senses from the aroma of the food to the clothes. A lot of times it is the everyday thing that ignites an idea in my head.
    Reading books and blogs also add to my inspiration base. Take a look at this site. I have gotten back into knitting and this site is a fun and funky read. I'm excited to see some more modern knitty things.
    The kiddies started school today so it has been a happy and sad day for me.

    Breakfast #23: Chai Spiced Oatmeal

    title
    So many thoughts are going through my head right now. Musings, decisions, problems, totally random bits of nonsense. How does a girl keep up with the world outside when the thoughts inside her head are already so copious and (often) disagreeing amongst themselves?!

    I won’t bore you with all the tedium that goes on between my ears. I’m not a mean girl. But suffice to say that I’ve got to put a rein on those whirling thoughts and organize my head. Not such an easy task. Especially if every thought is fighting for your attention with a lot of whining and foot-stamping.

    Times like these I have to put a mental “do not disturb” sign on my brain, carve a patch of time for me to think, and hunker down with my notepads and pastel-metallic ink pens. Yes, I am a big believer of lists being the solution to all life’s moments of disarray. And if those lists are on fabulous looking paper and color-coordinated ink so much the better (plus points for metallic ink).

    It also helps to fortify yourself with a breakfast that is extremely comforting and calming.

    I had been wanting to try this since I saw the Sunshine Oatmeal on Nupur’s One Hot Stove many (many!) eons ago. It was based on a recipe for Chai Oatmeal from the book Sunlight Cafe, the recipe of which Nupur generously shared with me. But like a lot of recipes I file away on my hard drive, it slowly got buried under a massive data pile-up. Thanks to a sudden bout of laptop spring cleaning, its sunny face resurfaced...right in time to see me through some much needed mental re-org. I adapted it somewhat, changing the volumes and adding and subtracting spices until I got a mix that was to my taste.

    Chai Spiced Oatmeal
    (adapted from
    Sunlight Cafe by Mollie Katzen...thanks Nupur!)
    • 1/2 cup old fashioned oats
    • 1 1/2 cup milk
    • 1 cinnamon stick
    • 3 cardamom pods
    • 2-3 whole peppercorns
    • 3 cloves
    • 3 whole coriander seeds
    • A pinch of saffron
    • 1 tablespoon honey

    - Make a little sachet for your spices. You can use a coffee filter or cheesecloth (I use empty tea sachets you can get at the Coffee Bean). Place the spices in your sachet and tie closed with some butcher’s string. If I were you I would make several already and store in an airtight container for future use.
    - Place sachet in a saucepan. You can tie one end of the string to the handle so you can easily pull it out later. Pour in the milk and set over medium heat.
    - Just before it comes to a boil, lower the heat and gently simmer until the milk is infused to your liking (about 5 to 10 minutes). Stir in honey to dissolve.
    - Stir in oats and cover. Leave over low heat until cooked and thickened to your liking, peeping in to stir once or twice to make sure it doesn’t stick to the pan.
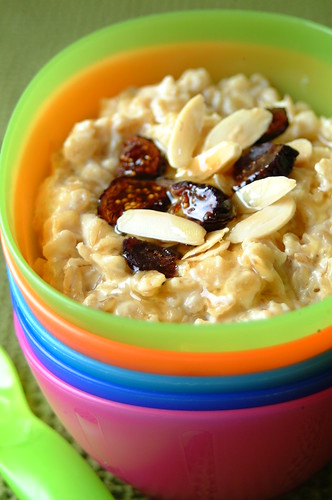
    - Serve hot. I sprinkled dried figs and toasted almond slivers on top but feel free to experiment with toppings! Serves one.

    I love oatmeal (don’t laugh...there are many of us out there) and I love chai. It’s no surprise then that I was absolutely smitten with this. It has the down-home, comfort factor of oatmeal coupled with the almost hypnotic fragrance of chai spices. It may be my overactive imagination but this felt totally therapeutic to me...like the aromatic spices where helping me center my thoughts while the familiar oatmeal was telling me that everything would be alright.

    Does that sound slightly barmy? I don’t think so. Each of the spices here have a history of healing in some form or other, and have been used by early civilizations both medicinally and gastronomically. Aside from that, as I always like to imagine, once upon a time people set sail across vast oceans and into the unknown for these spices....the lure of their mystical fragrance pulling many an adventurer (and fortune-seeker!) to faraway lands.

    Every time I have something redolent with these spices, I feel like I am a part, albeit a teeny-tiny one, of that fantastic adventure.

    Never underestimate the power of a great breakfast (and a great imagination!). Therapy never tasted as good (or was this exciting!)...nor came as cheaply :)