Another meme going around! For this one, I have been tagged by Paz of The Cooking Adventures of Chef Paz. This involved digging up five childhood foodie memories (yes, exactly like the title implies, very astute of you). So here goes...
1. Toffee Condensada - What's that you say? It's actually a name we gave to what most people know as dulce de leche. I am the eldest grandchild on both my parents' sides, and subsequently the only one who really got to know my maternal great grandmother. I called her Abo, which is short for abuela (grandmother in Spanish). Abo was a grand dame of a lady. Her word was law and she enforced strict rules on little me. I loved her dearly, and to this day she remains one of my great women role models and has taken on the status of "legend" in my head and heart. When I was was little girl I would play with her everyday. It was strictly me-and-her time. I would climb up on this big chair and she would take out a box of toys for me to play with. She would hand me one spoon (no more, no less) of this heavenly concoction for me to lick and slurp at while I was with her. The spoon would rest in a bowl so no sticky stuff would get on her things.
We called it Toffee Condensada because she would boil whole (unopened) cans of condensed milk in a vat of water for hours. Then when you take the cans out and open them...what was once condensed milk has miraculously turned into a sweet bronze-y sensation! I think this must have been my first lesson in really savoring food and not rushing the eating experience because Toffee Condensada had no seconds. Ever. It was just that one spoon and that was it. I must have learned that lesson well because to this day it pains me (physically and mentally) to rush a meal.
2. Mr. Goodbar - Yup, the Hershey's chocolate bar with peanuts. This too was from my Abo. This was Toffee Condensada's alternate. She would give me one (no more, no less) Mr. Goodbar, broken up in pieces and placed in a brown plastic bowl, for me to eat for the duration of my play-time with her. Again, another lesson in restraint. And even if my favorite chocolates today are all bittersweet or truffle-like, one taste of this and something just clicks into place in my tummy and in my heart.
3. Instant decaf coffee with lots of milk and sugar - My paternal grandmother, my Abuelita (again, spanish for grandmother), would always sneak me things I wasn't allowed to have. Coffee obviously being one of them. Without my mother's knowledge (heehee), I was slugging cuppa after cuppa, albeit decaf and loaded with milk and sugar. I still remember its creamy, sugary, mocha taste...so warm and comforting. I must have been 1st grade. My Abuelita was the queen of forbidden goodies! Whereas my Abo tempered the food pleasure she allowed me, my Abuelita was constantly plying me with food (she still is!)...the more fattening the better! Looking back, I think I am better for having both :-)
4. Little Nutella packets - I have actually mentioned this before. When my mother used to go to her favorite specialty food store store she would always bring me one back as a little treat. It came in those small foil-sealed packs, similar to the ones butter comes in when they serve it in the airplanes. It even had its own little plastic spoon with which to eat it. This was long before I discovered that Nutella actually came from a jar (can you imagine what a pleasant surprise that was?). All I knew of Nutella was that one little packet...pure chocolate hazelnut goodness to be savored solo and slowly.
5. Munggo - This is a Filipino dish of mung beans made into a soup, usually with some vegetable like malunggay (moringa) and perhaps a little shrimp or pork for flavor. It's very, very typical and served in households from every walk of life here. A lot of kids my age didn't really think it was anything special, and were usually made to eat it by their parents for it's health benefits. Not me. I loved it! I could eat tons. Really. My mom was ecstatic! This is definitely one childhood favorite that has carried on into adulthood because I still love it, and by the looks of it, I always will.
Ok, I don't think anyone will mind too much if I add just one more?
6. Pineapple Upside-down Cake - If you have read my previous post on this cake then you know that it has been a big part of my early culinary life. It was one of the first cakes I officially learned to bake (taught by my aunt, using a battered Betty Crocker cookbook). I have no idea if it just started as my family being super supportive of my early baking attempts, but they claimed to love it and could not get enough of it. And they still can't. So even when I really feel like making a something elegant and sophisticated, they still drag this one out of the ashes and back into the limelight. I even went through a horribly belligerent phase when I flatly refused to make it. They say that you can never escape your past. If my pineapple upside-down cake is any measure, then that's the solid gold truth!
So that's it! Thanks Paz for tagging me for a walk down memory lane :-)
Now I'm supposed to tag some other foodies for this little memory-meme. I'd like to invite Karen of The Pilgrim's Pots and Pans, who always has interesting food stories to tell! I'd also like to tag two new food bloggers I've"met": Kai from Bucaio and JeyC from A Tenderfoot's Foodventures.
Below is the meme tree. When it’s your turn, move down the list, drop number one from the top spot, move the numbers down, and place yourself in the number five spot. Don’t forget to link the blogs (except yours).
1. A Finger in Every Pie
2. The Traveler’s Lunchbox
3. Nami-Nami
4. The Cooking Adventures of Chef Paz
5. 80 Breakfasts
IMBB #18: Oliebollen

My first entry to the popular and much-loved food blogging event, Is My Blog Burning...hooray! This month's IMBB is hosted by Linda of At Our Table and is entitled "Summer's Flying, Let's Get Frying".
When I heard that frying was the theme for this month's Is My Blog Burning, I thought "Perfect!" because it just so happens that I have been dying to try out a recipe that dealt with just that. This particular snack is something for which I have had an unrequited craving for over a year, but due to said food item being on another continent, I had no way of satifying this craving unless I finally pulled my sleeves up and made it myself. What better way for me to attempt my maiden IMBB entry than with something I love to bits...Oliebollen!
First, a little background on my love for Oliebollen: A year or so ago, I was based in The Netherlands for around 3 months, for a job I was doing. I enjoyed my stay immensely and during that time discovered quite a few foodie items that I fell in love with -- raw herring with onions, Dutch pancakes with stroop, and Oliebollen. When Christmas time drew near, a wonderful stall with GEBAK (pastries) spelled out in lights appeared in the Dam Square (along with a giant Christmas tree and and ice skating rink...wahoo!), very near where I lived. The stall was filled with yummy delights and this is where I met, and was subsequently enamored by, Oliebollen. Oliebollen are Dutch fritters, usually filled with apples and raisins, kind of like a beignet. The stall sold different varieties but my favorite were the plain ones, just dusted with powdered sugar. When that stall set up shop, I must have eaten one (or more!) every single day. This was basically a deep fried ball of dough, but calories or cholesterol be damned, I was in love and no one was going to stop me!

Then one day, after the holidays, the stall and the oliebollen disappeared. I had no idea where they went. I searched high and low but never found them again. I learned later on that oliebollen is traditionally made during the holidays...but as I left The Ntherlands before the next holiday-time rolled around, I never had them again.
Fast forward to the present time. I am back home in my little piece of the tropics and start my fledgling food blog. A post I write which mentions stroop earns a comment from a lovely Dutch girl. When I mention other Dutch treats I sorely miss (oliebollen obviously being one of them) she generously shares her recipe. Have the fates conspired to reunite me with my beloved oliebollen?
You can find the recipe here. As I wanted to recreate my "plain" oliebollen, I made the following changes:
- I didn’t add the cinnamon to the dry ingredients at first.
- After my batter/dough was ready, before letting it rise, I halved it in two. One part I kept plain, and to the other I added: ½ teaspoon cinnamon, 50 grams raisin, and half of the apple chunks.
- I omitted the currants as you can’t really find them here.
This way, half my batch was plain and the other half had the traditional raisins and apple. I cannot even begin to describe my anticipation as I watched the soft balls of batter turn a lovely golden brown in the hot oil.
Finally they were done! I sprinkled powdered sugar generously on them and leaned in for a big bite, barely waiting for them to cool off a bit. BLISS! They were just as I remembered...soft, chewy, and tasty, with just the right amount of crisp on the outside. The apples and raisin are the perfect fruit pairings I think for this kind of fritter...but I still love the plain ones best. So there I was, lost in a good-food-funk and delicious memories...you can be sure that I won't be waiting for any kind of holiday before making this again!
80 Breakfasts is featured in Pinoyatbp!
Wasn't I surprised and so thrilled when, wandering through my comments here, I discovered this one:
"Hi! I was browsing through the different food blogs looking for a site to promote on the launching of our community blog when I happened to encounter yours. I was wondering if it is okay with you if we included you as our featured blog section since the topic for our launching is food? We at http://pinoyatbp.fil.ph would appreciate it very much! Thanks!"
Oh, my little heart was tickled pink! Would it be ok to feature my blog? Sure!!! Oooh, I'm still blushing :-)
Pinoyatbp (meaning Pinoy at iba pa, loosely translated to mean Filipino and more) is a Filipino community blog which aims to link Pinoys around the world through the wonderful medium of blogging. They already have a varied group of writers (a lawyer and doctor included!)...all Filipinos from different parts of the world.
Check them out here...and don't forget to look for their sweet comments on 80 Breakfasts on the sidebar :-)
Nutella Self Frosting Cupcakes

I love anything that has anything to do with chocolate or hazelnuts or both together. So you can imagine that Nutella is something to which I have a pretty strong attraction. I used to have it when I was a child, by itself, in a little plastic tub...much like those single-serve butter tubs. My mom used to get it for me as a special "treat" when she would shop at a nearby food store. It even came with its own little plastic spoon.
It was long after this that I discovered alternate uses for my little childhood snack...spread on bread or cake, eaten with ice cream, on fruits, to dip whole walnuts in, even on plain donuts. So you can imagine the happy surprise I had when I found a recipe for Self Frosting Cupcakes using Nutella at Nic's excellent blog bakingsheet.
I had to try it out and the results were just as I expected (and Nic described): a rich and tender cupcake that is the perfect host for the wonderful taste of the Nutella. They are wonderfully simple to make, and, as if that wasn't enough, they even look cute and adorable.
My testers were my brother (as usual) and my dad, who loved them as much as I did. There will definitely be a repeat performace. As Nic mentions, and I agree, these are perfect for picnics and potlucks as there is no messy frosting on top...it's baked right in! So this will be at the top of my list for my next potluck party...and I think I have one coming up...can't wait to whip these babies out.
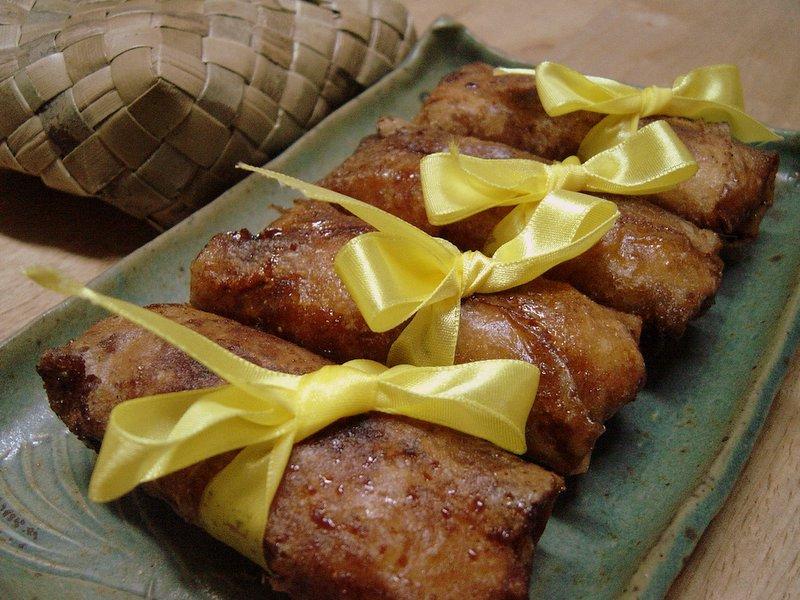
Lasang Pinoy: Yellow Ribbon Turon
I first learned about the Lasang Pinoy (Pinoy is local slang for Filipino) food blogging event from Karen of The Pilgrim's Pots and Pans when my blog was a mere 2 posts old. The idea was still being fine-tuned, to be launched on Ninoy Aquino day, details still in the works, but would I like to join? Oooh, I was a bit scared (I have never really cooked Filipino food, shame on me) but this was a Pinoy food blogging event, and I am Pinay (slang for Filipina), so I was definitely in. No questions about it!
You can learn all about this event and what it stands for here. For me, Ninoy is the epitome of all the good things a Filipino can achieve. He remains my inspiration and his words, "The Filipino is worth dying for", remains a mantra to keep the faith and do the right thing even if all odds seem against you, and to see the awsome beauty in a country that has so much to offer but is sometimes buckling beneath the weight of difficult times. I am not well versed in politics so perhaps my views are a tad idealistic but there you have it.
Here is a collection of personal stories about what transpired during that time, put together by Perla Daly. It includes her own story, plus those of others who have shared their stories with her.
I never got the chance to "take to the streets" during the 1986 rallies (my parents locked me in the house, I was 11 or 12 then) so I don't really remember a particular food associated with that time. I chose instead to feature a typical Pinoy snack that is sold on the streets (to represent the rallies) and is sweet (to reflect the Filipinos sense of "laughter in adversity" -- we have the sweetest smiles and the easiest laughs here...come see!). And of course, there's the yellow ribbon...representing the song "Tie a Yellow Ribbon 'Round the Old Oak Tree", which became an anthem of sorts for Ninoy's return after his three-year exile in Boston.
Turon is a typical Pinoy sweet snack that vendors peddle in street corners across the city. These yummy bundles consist of saba bananas coated in brown sugar, wrapped in lumpia wrapper (springroll wrapper), and fried. Langka (jackfruit) is also added sometimes (although I didn't add any to mine). My Yellow Ribbon variety has a special something though. Just as Filipinos often add laughter in their lives to counteract hard times, I too have added some extra sweet bits to give this snack added oomph!

The "sweet bits" I refer to are none other than Choc-nut, Curly Tops, and Flat tops! Every Filipino around the globe will recognize these local favorites. These are snacks that smack of my childhood. I have cousins in Spain that demand Choc-nut every time someone visits. Curly Tops and Flat Tops are the only things that got me through accounting exams in college. Suffice to say that they have a cult-following. Choc-nut is basically labelled as "peanut milk chocolate". The peanuts are ground up but you can still feel a little of the roughness. Flat Tops and Curly Tops are local chocolates made by Ricoa and bear the tag line "Rich Chocolate, for the chocolate lover" (woohoo! that's me!). Also, there is no distinction in either taste and appearance between the Flat and Curly Tops. Hmmm...this fact remains unexplained to me to this day. Anyhoo, much like the rest of our dishes, although a little mysterious and sometimes unexplained, they are damn good!

So here's how to whip up some Lasang Pinoy sweetness in your kitchen...
Yellow Ribbon Turon
(makes 20 pieces)
- 10 saba bananas, sliced lengthwise
- 20 lumpia wrappers (spring roll wrappers)
- brown sugar (start with ½ cup then keep adding when you run out)
- 10 pieces Choc-nut chopped (this will also depend on how much you want to put into your turon)
- 10 pieces total Curly Tops & Flat Tops, chopped (again, this will also depend on how much you want to put into your turon)
- a little water
- oil for frying
Here’s what you do:
- Spread the brown sugar in a bowl wide enough to lay the banana slices in.
- Coat a slice of banana in the brown sugar.
- Place the coated banana on one end of the lumpia wrapper (see picture)
- Place alternating chunks of Choc-nut and Curly/Flat Tops on the banana slice (Feel free to do this to your taste, if you want more of the peanut or more of the chocolate flavor. If you want, you can also place only Choc-nut or only Curly/Flat Tops and have two separate turon flavors.)
- Fold wrapper and banana over once, then fold the side ends in, then continue folding until you reach the end of the wrapper. Seal the end with water.
- Repeat procedure with the rest of the banana slices.
- Fry in hot oil until golden brown.
When you fry the turon, the sugar melts and melds with the lumpia wrapper, making it crunchy and caramelized. When your teeth successfully breach this crunchy outer layer of sweetness you are rewarded with the soft creaminess of the banana and the chocolaty-peanut goodness of the Choc-nut and Curly/Flat Tops, which by now have melted together. YUM!
Thanks to Lasang Pinoy for providing such a fun venue for exploring our local eats! Turon is a simple and very common snack here, but much loved, at least by this particular Pinay :-)
Breakfast # 5: Poached Pear & Ricotta Tartine
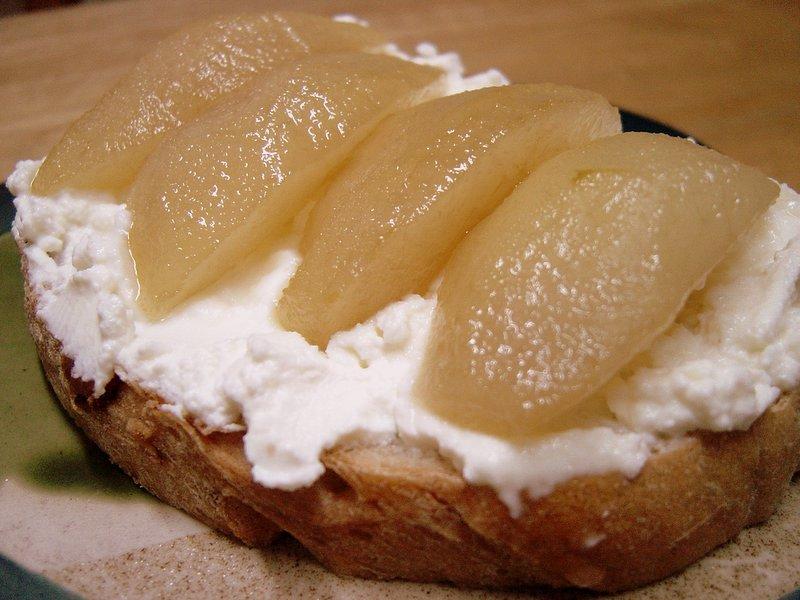
Breakfast time agian and my thoughts turn to what to eat! I had some pears left over from my Moroccan dinner and wanted to use them. I was craving for a cheese and fruit combination so the pears were definitely in. I poached them in some simple syrup for added sweetness. Had some ricotta I needed to use up as well. Perfect!
This reminds me of the snacks I used to have in Spain of queso fresco (a fresh white cheese that my cousin would eat for his diet) with honey and pine nuts. When I was thinking of this dish in my head, I already expected a yummy treat, but it was so much better that my expectations! The sweet crunch of the poached pears blended beautifully with the mild cheesy creamy-ness of the ricotta. Texturally and taste-wise it was the perfect match. All on a bed of lightly toasted walnut bread, which gave it an added dimension of a nutty starch. Ooooh! I couldn't get enough...
Poached Pear & Ricotta Tartine
- Peel, core, and quarter 1 pear.
- Squeeze some lemon juice on the pear slices and toss.
- Poach in a mixture of sugar and water (I just did this to taste, no measurements, just based on how sweet you want it. You can also do this with wine...yum!).
- Lightly toast a slice of walnut bread (or your bread of choice, but nut breads are nice with this).
- Generously spread some ricotta on your bread.
- Arrange the poached pear slices on the ricotta and drizzle some of the syrup over them.
Simple, delicious, and sure to put a smile on your face in the morning. If you have an early day and don't have the time to poach the pears, just do it the night before, so you can quickly assemble this, and enjoy, before rushing off.
Virtual 40's-70's Party: Pineapple Upside-down Cake

Oh! My first food blogging event! How exciting (ok and I'm a little nervous too!)! I am quite new to the food-blog-o-sphere, and was really not planning to join any events in the near future (just watch and learn, that was my plan), but when I heard that Megan of iheartbacon.com and Deepfry of Yum! were planning a Virtual 40's-70's Party I just couldn't resist. How fun and peachy-keen is that, right?
Another reason I wanted to join is because of this. This dish you see here, that I have made maybe a trillion times in my life. Pineapple Upside-down Cake. Just the name alone bring to mind a 50's housewife in an apron and a beehive. This is my family's bar-none favorite thing. Their's, not mine. I mean it's yummy and all, but I wanted to make things great and exotic! But no, it was always: "Can't you just make the Pineapple Upside-down Cake?" Phooey. Well, now it's payback time and this cake is going to be my ticket to virtual 50's fun!
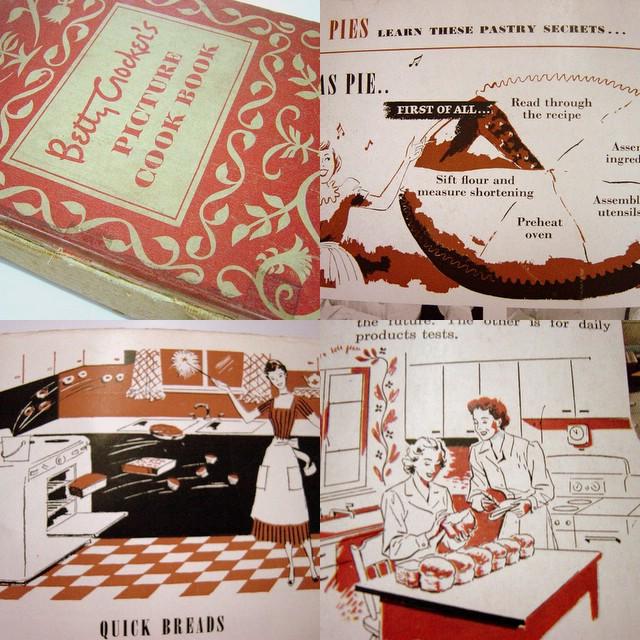
The recipe I use, and have been using (much altered over time), is from none other than another 50's pillar of Stepfordian baking...the Betty Crocker's Picture Cookbook! In fact, I have the 1950 First edition (9th printing though). Not discovered in a second-hand bookshop or book market, but handed down from a great aunt. As you can see in the picture below, it's not the newer ring-bound version. The book binding in the side has actually been worn away already, by many greasy kitchen hands no doubt. In any case, it's so kitschy it's cool. Check out the funky graphics of women in wide skirts and cinched waists, singing as they cook. Ok, nevermind that, check out the quick breads flying out of the oven! Now that was a domestic goddess!
Ok, now for the recipe. As I mentioned, over time (I have been making this since grade school, I am now 30), I have made a number of changes in the recipe. For one Betty doesn't have any butter in the cake itself. Probably to make up for the sugar and butter topping. Well, I wanted the cake more moist and buttery so adding some butter in the batter (yes! I'm down with the lingo now) did the trick. I also added more butter to the topping. You see, my family likes this cake super rich and wet and soaking with butter-y pineapple sweetness. Also, I have tried doing it with the "separating the yolks and whites bit", where you fold in the "stifly beaten egg whites" in the end (Betty doesn't do this) to make it a little lighter. Oh yeah, and I don't cook it in a skillet.
Anyhoo, enough chit-chat. Here's the recipe:
Pineapple Upside-down Cake
(adapted from Betty Crocker's Picture Cookbook)
For the topping:
- ½ cup butter
- ½ cup brown sugar
- Pineapple slices
- Maraschino cherries
Melt the butter (I use the microwave, maybe 20-25 seconds). Spread/pour melt-y butter on the bottom of a 9 inch pan. Sprinkle with the brown sugar, make sure it’s even. Arrange pineapples slices and cherries in “an attractive pattern” atop the butter-sugar coating.
For the cake:
- 2 eggs (separated)
- 2/3 cups sugar
- 1/4 cup butter (this may be too butter-y for regular people so you can decrease this to 1/8 cup)
- 6 tablespoon juice from the pineapple
- 1 teaspoon vanilla extract
- 1 cup sifted all purpose flour
- 1/3 teaspoon baking powder
- ¼ teaspoon salt
Preheat oven to 350F. Cream butter and sugar together. Gradually beat in the egg yolks. Add the juice from the pineapple and the vanilla and beat, in all at once. Sift the flour, baking powder, and salt together, and beat in all at once. Do not over mix. Beat egg whites until stiff. Fold egg whites into the batter. Pour the batter into your prepared pan and stick it in the oven. Bake for 45 minutes or until a toothpick “thrust into the center of the cake” comes out clean. Turn upside down onto a nice serving plate. Don’t remove the pan for a few minutes so all the sugar-y topping runs down over your cake (an does not stay stuck to your pan).

You may be wondering what that crazy looking picture is on the upper left hand corner on the collage above. Well, as a spin-off to this virtual party, Kevin of Seriously Good has come up with a clever little contest and that is my entry. My my, first a food blogging event, and now a food blogging contest? I'm getting quite ambitious!
So there you have it. The ubiquitous Pineapple Upside-down cake. It's always been around, though much ignored for some time, what with the advent of the elegant "supermodel" desserts. In truth, I actually love this edible 50's stereotype. It's definitely stuck by me, and gotten me things I would never have gotten just on my charm alone. So here's to you Mrs. Crocker, and to the millions of Pineapple Upside-down Cakes who are, as we speak, planning their comeback.
Moroccan Meal Part II

As promised here's the second part of my Moroccan meal. As I mentioned in Part I, I was enthralled by an article I found in Vogue Entertaining + Travel about a mother and daughter, and how cooking formed a part of their lives. It was one of those "at home" features with stories told from both the mother's and the daughter's perspective. Originally from Egypt (I am brimming with news about Egypt, but that's for another post), their recipes are Moroccan, Turkish, and of course, Egyptian. I chose two Moroccan recipes for a nice dinner at home with my boyfriend, C, my brother, and his girlfriend.
The main dish Chicken with Caramelized Baby Onions and Pears was good and everyone enjoyed it, but the real jackpot was the Roast Capsicums and Chickpeas with Fresh Goat's Cheese. My brother licked the bowl clean and he is not one for salads or veggies in any shape, form, or size!
Here's the recipe, which I altered somewhat...
Roast Capsicums and Chickpeas with Fresh Goat's Cheese
(adapted from Vogue Entertaining + Travel August / September 2005 issue)
- 3-4 red capsisums (depending on how much you like capsicum...we loved it so I used almost 4, only to have the leftover capsicum added later by my brother!)
- a 420 gram can of chickpeas/garbanzos
- 1/4 cup extra virgin olive oil
- the juice of 1 lemon minus 1 tablespoon (if you think it needs more lemon juice later on then just add the extra tablespoon, but I thought it was fine so I didn't use up the whole lemon as the recipe called for)
- 2 1/2 cloves garlic, peeled and minced (the recipe called for more, so feel free to add another clove to up the garlic factor)
- salt and pepper to taste
- 1-2 tablespoons chopped parsley
- 150 grams goat's cheese (the original recipe called for more but this was all I had and it worked out fine)
Here's what you do:
- Roast capsicums in your oven (or your preferred capsicum-roasting technique) until soft and skin is black and blistered. Let cool, remove seeds and stems, peel, and then cut into wide strips. Set aside.
- Drain the chickpeas/garbanzos and rinse in cold water.
- Dress chickpeas/garbanzos in 2 tablespoons of the olive oil, the lemon juice, 1 of the minced garlic cloves, salt, and pepper. Taste and see if it needs more of the components, then add accordingly.
- Mix capsicums and parsley into the chickpea/garbanzo mixture. Gently, you don't want to it to become mushed.
- In a separate bowl, mash the goat's cheese with the remaining 1 minced garlic clove and 1 tablespoon olive oil. Taste and see if it needs extra garlic. I probably tossed in half a clove extra.
- Crumble the goat's cheese mixture on top on the chickpea/garbanzo and capsicum (which you have arranged on a lovely platter beforehand).
This was excellent and had all four of us fighting over the last dregs and licking the platter clean. It's so simple and yields such great results. The flavors melded and complemented each other perfectly: the sweetness of the capsicums, with the chickpeas' yielding firmness and nutty/beany flavor, and the garlic kick...all strung seamlessly together by the simple, classic dressing of extra virgin olive oil, lemon juice, salt, and pepper. Yum!
Note: Next time I will roast more capsicums and place the extra ones in a jar, with some extra virgin olive oil and minced garlic, and keep it on hand to make it even easier to whip this up in a flash.
Moroccan Meal Part I

I can't help buying Vogue Entertaining + Travel. It's such eye candy and it combines two of my favorite things, food and travel, all done in its very Vogue-ish way. This is the first time I have tried cooking anything from there though. This meal was inspired by an article in the August/September 2005 issue about about Claudia Roden (cookbook author) and her daughter Nadia. The article talked about the art they create and (of course) the food they make together. All the talk and pictures of them cooking amongst Nadia's paintings in their homey kitchen made me ache to try a couple of the dishes. I decided on the Chicken with Caramelized Baby Onions and Pears (pictured above), and the Roast Capsicums and Chickpeas with Fresh Goat's Cheese. I changed some of the proportions and ingredients based on what was available to me and because, well, I like doing that :-)
Chicken with Caramelized Baby Onions and Pears
- 4 small or 2 large firm beurre bosc pears (I used 4 small pears)
- 40 grams unsalted butter
- sunflower oil (I didn't have any so I just used canola oil)
- 500 grams eschalots or baby onions (I used 250 grams of our native onions, cut the quantity in half because our little native onions here are much stronger)
- 1 onion, chopped
- 1 large chicken, jointed (I used 5 leg&thigh pieces...because I like dark meat better)
- sea salt and pepper to taste (I just used rock salt)
- a good pinch of saffron threads
- 1 teaspoon ground ginger (now, I don't know if this meant powedered or fresh so I just ground up some fresh ginger)
- 1 teaspoon ground cinnamon
- 1-2 tablespoons clear honey (didn't have any "clear" honey, so I used chesnut honey)
- 100 grams blanched almonds (toasted), for serving (this is optional but I love nuts in food so I included it)
Here's what you do:
- Quarter and core pears (but don't peel) then sautee in butter and oil until lightly colored. Set this aside for now.
- Prepare the baby onions: Blanch them (5 minutes in boiling water) and peel. Fry them in a little oil, tossing them around until brown and caramelized all over. Set aside.
- In a heavy based pan or casserole, wide enough to hold all the chicken pieces in one layer (I just used the widest pot we had, the pieces could barely fit in one layer so I had to juggle them around a bit) fry the chopped onions in 3-4 tablespoons of the oil until soft. Add the chicken pieces and season them. Brown on all sides.
- Now add around 1 cup of water and stir in the saffron, ginger, and cinnamon. Cook, covered, at low heat for around 10-15 minutes (at this point, if you used pieces from a whole chicken, you should check if the breasts are cooked and remove from pot, returning them at the very end).
- Add the pears (if they are still firm, if not add them at the end) and caramelized onions and continue cooking, covered, until chicken is very tender, turning occasionally (add a little water if it looks like it's drying up).
- Remove chicken from pot and set aside. Stir in honey and check seasoning. Add the honey little by little to your taste. Reduce the sauce until it looks thick and sticky. Return chicken to pan to heat through. At this point you can add the pears, if you didn't add them earlier, and the chicken breasts, if you used them.
- Before serving sprinkle with the toasted blanched almonds.
I love these dishes that have fruits and nuts in them (with certain exceptions) and I was quite excited to try this one. On the whole it was good, but could be greater. It was tagged as "one of the classics of Moroccan cooking" and it definitely had a distinct Moroccan taste. The chicken was wonderfully tender. The pears were a great component, soft and sweet, and subtly infused with the flavors of the dish...and a very good partner for the chicken. However, the flavor was a tad weak. Perhaps I should have went for all 500 grams of baby onions (to hell with our native onionettes' fire!), or maybe upped the ginger (the cinnamon taste was definitely present, pleasant and not overpowering, so the cinnamon proportion was just right). Or maybe season the chicken with more salt and pepper. I liked it though so I'll try this again for sure, tweaking the seasoning a bit more.
Note: The chestnut honey did leave its mark on the flavor of the dish. You could taste mild traces of it. I thought it went very well with the overall taste but I'll try using clear honey next time and observe the difference.
Recipe and notes for the Roast Capsicums and Chickpeas with Fresh Goat's Cheese to be posted shortly. This was actually the big winner of the meal. My brother, who isn't much into veggie dishes or anything that could be called a salad, couldn't get enough of it! Stay tuned...
Dry Roasted Ribs

I had been wanting to try this out ever since I read about dry ribs on iheartbacon.com, a wonderful food blog by Megwoo that immediately endeared itself to my bacon-loving heart. The description made my mouth water and the method sounded pretty simple so I was raring to go. I tried it twice, first with beef short ribs and then with pork baby back ribs (pork ribs pictured here, like Megwoo I only have a picture of the "part 2" because the first try got eaten up before the camera could get to it!).
Both were excellent! The flavor was great and the meat so tender with crispy outer edges. The beef ribs reminded me of Crispy Tadyang, a local dish here of deep fried beef spareribs.
Megwoo rubbed her ribs with salt and pepper before sticking it in the oven but I used some St. Louis Rib Rub I had lying around instead. Here's what she did: Basically you just rub your seasoning on the ribs and stick them in the oven at 350 F. You flip them after 45 minutes and cook for another 45 minutes. Then turn off the heat and leave them in the oven for another 30 minutes. This is what I did for the pork ribs, but I had to cook the beef ribs longer in order for them to get tender.
Nice surprise: I didn't put enough rub on the beef ribs (it was my first try) so I just sprinkled the ribs with rock salt while they were still hot. Oh boy. That sure provided the needed magic! It was so tasty!
I served the ribs with Rosemary Garlic Potatoes:
- 4 potatoes, cubed
- 1 1/2 teaspoon rosemary (I used dried, no fresh, sigh...)
- 4 cloves garlic, chopped
- Extra Virgin Olive oil
- Salt and pepper
- Parsley
Place cubed potatoes in a baking dish. Drizzle with olive oil. Sprinkle rosemary, garlic, salt, and pepper. Toss around until everything is coated. Bake until potatoes are tender. Sprinkle with parsley before serving.

Look at that meat! There is just something so primal about sticking a big hunka-hunka meat in your oven and coming out with this big roasted slab. I swear, I just grabbed at it and tore some ribs off and ate with my hands. I just had to. It made me do it!
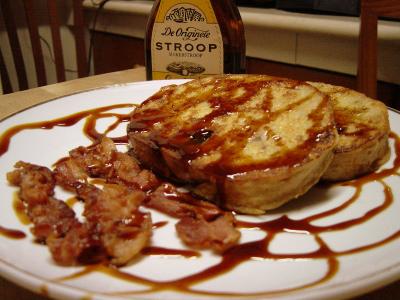
Breakfast # 4: Walnut French Toast with Bacon & Stroop
I was feeling the need for extra sustenance this morning. Tons of work and all that. The situation called for three things: carbs, something sweet, and BACON. Yup, this little triumvirate can work wonders, at least for me, and this is how the holy trinity of breakfast elements manifested itself...
Walnut French Toast with Bacon & Stroop (serves one harried and running-on-empty person)
- 1 egg
- 1/4 cup milk
- 2 slices walnut bread (yum!)
- 1 tablespoon butter (I added more midway into the cooking because, well, just because...)
- 3 strips bacon
- Stroop
Here's what I did...
- Beat the egg and milk together.
- Soak the walnut bread in the egg-milk mixture.
- Heat pan and add butter.
- Add soaked bread to pan and cook till nice and golden brown.
- Place bacon in the same pan and fry until crispy.
- Put everything on a plate and drizzle generously with Stroop.
That sure hit the spot!

A word on Stroop: Stroop is my favorite all around syrup. Dutch "sugar syrup", also known as sugar-beet syrup or treacle syrup. It's dark, thick and super sticky and has it's own distinct flavor. The flavor actually reminds for some strange reason of piyaya, a local snack with muscovado stuffing. Anyhoo, I love it, enough said. I had it all the time on my pancakes in Amsterdam and hauled some bottles home with me. I can eat it with anything and, aside from pancakes and french toast, it's especially good with bacon & cheese & butter sandwiches. I dread the day I run out...
Dinner in a flash...
Ideally, I like to plan dishes in advance, mulling over possible candidates and ingredients in my head. Sometimes though (and I am sure lots of other people can relate), a mealtime just kinda creeps up on your busy schedule with no meal prepared. This happened the other night so I had to scrounge around for random ingredients to throw together and here's what happpend...
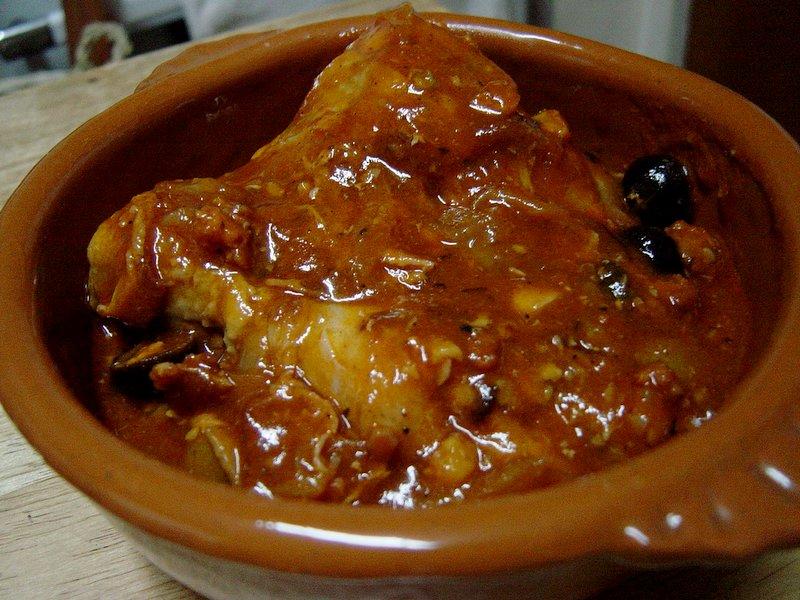
Kinda Spanish Chicken ChichaJo
- 4 pieces chicken (this was all I had, 2 drumsticks and 2 thighs, but you can use breasts if you are so inclined)
- Bacon, chopped into 1 inch slices (I probably used 1/4 - 1/3 cup)
- 1/4 - 1/3 cup chorizo (any kind will do, but preferrably one of Spanish ancestry...I just used what was lying around...this was a throw-together dish after all. I chopped it up into tiny pieces so that it incorporated itself into the sauce)
- 1 Tablespoon honey (you can adjust the amount to your own taste)
- 1/3 cup red wine, I may have used more (I used a bottle of merlot that was sitting around more than half empty. Hmmm...seem to have a number of opened bottles of booze laying about)
- 1 can tomato sauce (mine was around 300++ grams, I am sure this will be even better with canned whole tomatoes or maybe even fresh)
- Garlic (about 4 cloves)
- 1 medium onion, sliced
- Some green and black olives, sliced in half
- a little over 1/2 teaspoon Pimenton Dulce (smoked paprika from Spain, I get mine at Terry's Selection)
- Dried chili flakes (depends on your heat-tolerance)
- Salt & Pepper to taste (I actually ended up not using any salt as the saltiness from the olives was enough)
- Olive oil
Here's what you do...
- Brown the chicken in some olive oil and then set aside.
- In the same pan sautee the garlic and onions.
- Add your bacon and chorizo and sautee until just cooked through.
- Toss in the olives, pimenton, and dried chili flakes.
- Toss in the chicken and toss around until everything is nicely mixed and chicken is coated with all the good stuff in the pan.
- Pour in the wine and let the alco evaporate.
- Add the tomato sauce and honey, mix and let simmer.
- Add salt and pepper to taste (I just added pepper).
- Simmer until chicken is done and tender.
That's it. My brother and I loved it! The reason I dubbed it as "kinda Spanish" is because of the Spanish elements (like the chorizo and pimenton) and because it has a similar tone as a lot of Spanish chicken recipes I have...hmmm, my mad grab for ingredients may not have been so random after all.
Boracay Bounty

Presents! Yey! My boyfriend C just returned from a business trip in Boracay (lucky duck!), one of my favorite beaches in the country, and brought back some yummy goodies...I love yummy-goodies-as-presents :-)
The bounty: Calamansi (calamondin) muffins and brownies from Real Coffee! Hooray!
Real coffee is an adorable cafe on the island that serves up great coffee (natch), sandwiches, breakfast goodies (yes!), and all sorts of yummies. But their bestsellers are their calamansi muffins and brownies, which have a cult following and for which people line up in their bikinis and sarongs to place their order for boxes to bring home...which is likely what my C did (not in a bikini and sarong I hope!). I like to sit at the bar (what is it with me and bars?) so I'm thisclose to all the cooking and baking action going on behind the counter, and I can immerse myself in all the lovely smells...sigh.

Anyhoo, I plunked myself down and promptly enjoyed one each (!)...and the rest were saved for future breakfasts.
The brownies are huge and challenge your mouth's ability to stretch wiiide open to get bite after delicious bite. Its very dense and rich and oh-so-chocolatey...packs a punch I tell you! If you stick in in the fridge it takes on an almost fudge-like quality.
The calamansi muffins are my favorite though...rich, moist, butter-y, with a hint of the citrus-y calamansi taste. It was the perfect ray of sunshine to bring back from Boracay to a city girl suffering from the rainy season blues...
Real Coffee
Near Boat Station One
(by Island Souvenir)
Boracay
Philippines
Tel: 036 2885340
Subscribe to:
Posts (Atom)